Recent Posts
Why Trust SERVPRO with Your Property Cleaning Needs
4/15/2024 (Permalink)
 Here are a few ways our team at SERVPRO of South Philadelphia/SE Delaware County can help you clean your property!
SERVPRO of South Philadelphia/SE Delaware County is your trusted partner for all your commercial cleaning needs. SERVPRO of South Philadelphia / SE Delaware County has the advanced training and equipment needed to clean and restore your business after any type of damage. We are locally owned, and our highly-trained team of certified professionals is ready to respond - every day, any time. Our goal is to help minimize the interruption to your life and quickly make it "Like it never even happened." Here are a few ways our team at SERVPRO of South Philadelphia/SE Delaware County can help you clean your property:
Trash Chute Cleaning
We’ve recently added trash chute cleaning to our extensive list of services. Here are a few reasons why as a commercial business, you should consider trash chute cleaning:
- Eliminate Odors: Say goodbye to unpleasant smells that can linger in your building. Our professional trash chute cleaning removes built-up grime, bacteria, and odor-causing substances.
- Prevent Pest Infestations: Regular cleaning of trash chutes discourages pests like rodents and insects from making your building their home.
- Enhance Air Quality: Clean trash chutes can significantly improve indoor air quality by reducing the spread of harmful bacteria and allergens. Breathe easy knowing that your building fosters a healthy environment for all occupants.
- Maintain Fire Safety: Dirty trash chutes pose a serious fire hazard. Our expert cleaning technicians ensure thorough removal of flammable materials, reducing the risk of fire and providing peace of mind.
Whether you’re a commercial business with a lot of employees or a commercial apartment building with a lot of residents, our team can be on the job in no time to get your trash chute cleaned up!
Air Duct & Dryer Vent Cleaning
Ventilation systems are often the biggest culprit and poor indoor air quality. Make it a priority to inspect the ductwork of your home or business. If your HVAC has been operating for some time without attention, it could be circulating, one or more of the following:
- Dust
- Pollen
- Odors
- Dirt and debris
- Other contaminants
SERVPRO of South Philadelphia can inspect and determine if duct cleaning is necessary and we will make recommendations about the best way to address any indoor air quality concerns. Our goal is to provide high-quality service to each customer and achieve a cleaner, healthier more energy, efficient, indoor environment.
More Services with SERVPRO®
As a trusted leader in the restoration industry, SERVPRO of South Philadelphia / SE Delaware County can handle partial room losses, large catastrophic commercial/ industrial losses, and regional storm response. We are part of the Philadelphia Region Disaster Recovery Team and have a large and comprehensive inventory of equipment and vehicles and staff to respond quickly and professionally. Here are some of the specifics of what services we have available to our customers:
- Water Removal & Dehumidification
- Fire, Smoke, and Soot
- Mold Remediation
- Sewage Losses
- General Contracting and Rebuilding Services, Demolition
- Document Drying
- Contents Claim Inventory Services
- Deodorization
- Pressure washing (hot and cold water)
- Commercial Carpet & Upholstery Cleaning
- Biohazard, Crime Scene & Vandalism
- Tile & Grout Cleaning
- Ceilings, Walls & Hard Floors (stripping & waxing)
If you need any of the services and are located in the Philadelphia/Delaware County area, contact our team at SERVPRO of South Philadelphia / SE Delaware County at (215) 243-0430 or (610) 237-9700. We’re available 24/7/365 to help you after property damage!
Navigating the Flames: The Dangers of DIY Fire Restoration
4/12/2024 (Permalink)
When a fire ravages through a home or business, the aftermath can be devastating. In the wake of such a disaster, the impulse to initiate immediate restoration is understandable. However, attempting to undertake the restoration process without professional expertise can pose significant risks. In this blog, we'll explore the dangers of DIY fire restoration and why relying on experienced professionals is crucial for a safe and effective recovery.
Unseen Structural Damage
- Fires can compromise the structural integrity of a building. DIY restoration efforts may overlook hidden structural damage, leading to potential hazards and safety risks.
Inadequate Smoke and Soot Removal
- Smoke and soot residues are pervasive and can cause long-term damage if not properly addressed. DIY attempts may result in inadequate cleaning, leaving behind harmful particles that can impact indoor air quality and structural elements.
Electrical Hazards
- Fires often damage electrical systems. DIY restoration attempts may expose individuals to electrical hazards if the wiring is not thoroughly inspected and repaired by a qualified professional.
Incomplete Odor Removal
- Smoke odors can linger long after a fire is extinguished. DIY methods may mask odors temporarily, but without professional intervention, the root cause of the smell may persist, leading to persistent and unpleasant scents.
Improper Handling of Hazardous Materials
- Fire damage can result in the presence of hazardous materials such as asbestos or lead. DIY restoration efforts may inadvertently expose individuals to these substances, posing serious health risks.
Lack of Specialized Equipment
- Professional fire restoration companies utilize specialized equipment designed for efficient cleanup and restoration. DIY attempts may lack access to such equipment, leading to incomplete restoration and potential long-term damage.
Mold Growth
- Fires often involve water damage from firefighting efforts. Inadequate drying and restoration may create favorable conditions for mold growth. Professional restoration services address water damage comprehensively to prevent mold infestations.
Insurance Complications
- DIY restoration efforts may result in incomplete documentation, making insurance claims challenging. Professional restoration companies have experience working with insurance providers, ensuring a smoother claims process.
Delayed Restoration
- DIY projects, especially in the complex realm of fire damage restoration, can be time-consuming and may lead to delays. Swift and professional restoration is essential to prevent further damage and increase the chances of salvaging belongings.
Comprehensive Assessment
- Fire damage restoration involves a thorough assessment of the entire property. DIY attempts may lack the expertise to identify all areas affected by the fire, leading to incomplete restoration and potential future issues.
While the desire to restore normalcy after a fire is entirely understandable, the dangers associated with DIY fire restoration cannot be overstated. Professional fire restoration services bring expertise, specialized equipment, and a systematic approach to ensure a safe and effective recovery. By entrusting the restoration process to experienced professionals, individuals can navigate the challenges of fire damage with confidence, knowing that their property is in capable hands.
The Mold Equation: Understanding the Impact of Humidity
3/7/2024 (Permalink)
Humidity, the measure of moisture in the air, is a critical factor in the mold growth equation. To maintain a healthy living environment, it's essential to comprehend the role of humidity in the mold development process. In this blog, we'll explore the intricate relationship between humidity levels and mold growth.
The Mold Growth Equation
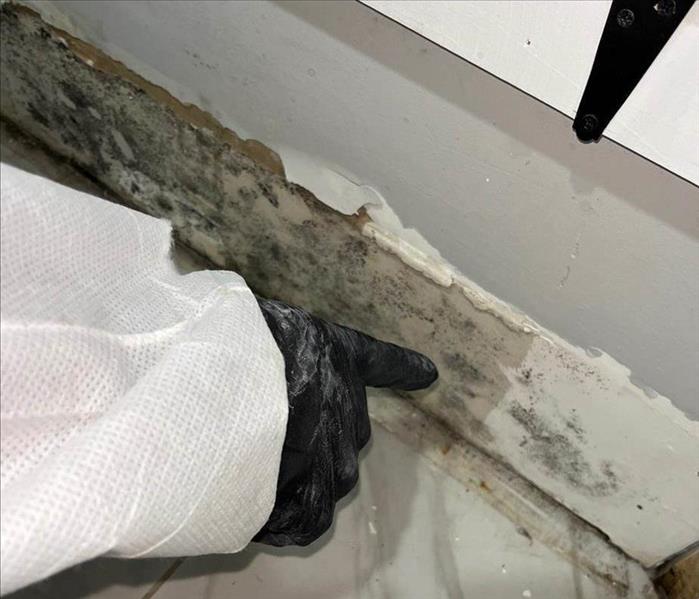
Mold spores are omnipresent in the air, lying in wait for the right conditions to activate their growth. Humidity serves as the catalyst, initiating the mold growth process.
Mold thrives in environments with elevated humidity levels. Optimal conditions for mold growth typically occur when humidity surpasses 60%. At these levels, mold spores find the moisture they need to flourish.
Humidity levels in indoor spaces can vary based on external factors, seasonal changes, and indoor activities. Understanding these variations is crucial in managing mold growth effectively.
Controlling Humidity to Prevent Mold Growth
Regularly monitor indoor humidity levels using a hygrometer. This device provides real-time data, allowing you to take corrective action when humidity levels rise.
To help limit mold growth, aim to keep indoor humidity below 60%. This can be achieved through proper ventilation, dehumidification, and moisture control.
Ensure proper ventilation in high-humidity areas, such as bathrooms, kitchens, and basements. Adequate airflow helps reduce moisture buildup and inhibits the conditions conducive to mold.
Install and use exhaust fans in areas prone to moisture, especially during activities that generate humidity, such as cooking or showering. These fans help expel moist air and maintain lower humidity levels.
Promptly address any leaks or water intrusions in your home. Leaks can lead to increased humidity levels and create the ideal environment for mold growth.
Dehumidifiers are effective tools for controlling indoor humidity. Use them in areas with consistent moisture issues or during periods of high humidity, such as rainy seasons.
Ensure proper insulation in your home to prevent condensation. Insulation helps maintain temperature consistency, reducing the likelihood of moisture buildup and mold growth.
While indoor plants offer numerous benefits, they release moisture through a process called transpiration. Limiting the number of indoor plants can help manage humidity levels.
If you have indoor plants, avoid overwatering them. Excess water in plant containers can contribute to elevated humidity levels in the surrounding area
Understanding the role of humidity in the mold growth equation empowers homeowners to take proactive measures in maintaining a mold-resistant living space. By monitoring humidity levels, implementing proper ventilation, and addressing moisture issues promptly, you create an environment that is less conducive to mold growth. Controlling humidity emerges as a key strategy in the broader effort to maintain a mold-resistant home.
What to Do When Your Basement Floods: Steps to Take
2/15/2024 (Permalink)
A flooded basement can be a homeowner's worst nightmare. Not only is it damaging to your property, but it can also pose safety hazards. Knowing what to do when your basement floods can minimize damage and ensure everyone's safety. In this blog post, we will discuss steps to take when faced with a flooded basement.
Ensure Personal Safety
Before entering the flooded basement, ensure your safety and avoid hazards. Turn off all electricity connected to the basement, including circuit breaker switches. If you are unable to access the circuit breaker, contact your power company to have it shut off. Additionally, wear protective gear such as rubber boots, gloves, and goggles to prevent contact with contaminated water.
Determine the Source of the Water
Identifying the source of the water is crucial in addressing the issue and preventing future flooding. Water intrusion could be from heavy rainfall, plumbing leaks, or sewer backups. If the issue is from a plumbing leak, turn off the water supply leading to the affected area.
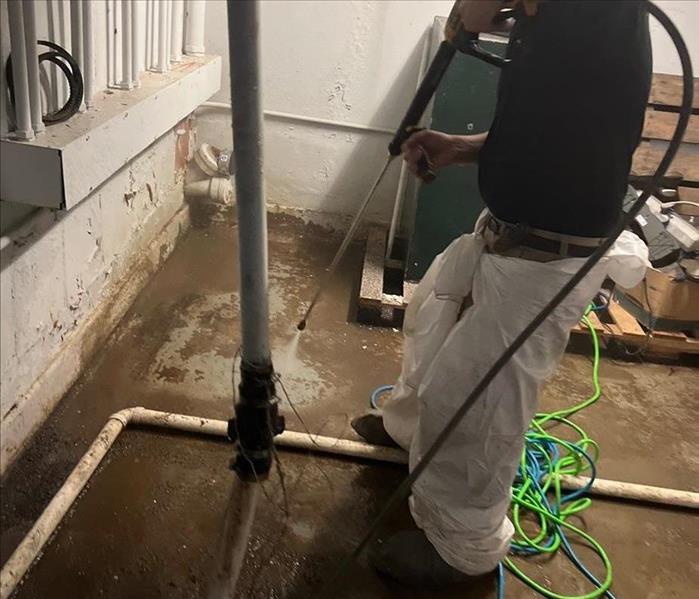
Begin Water Removal
The sooner you begin water removal, the less damage your property will incur. Use a sump pump, wet-dry vacuum, or buckets to remove the standing water. Be sure to dispose of the water properly and legally, following your local and state regulations.
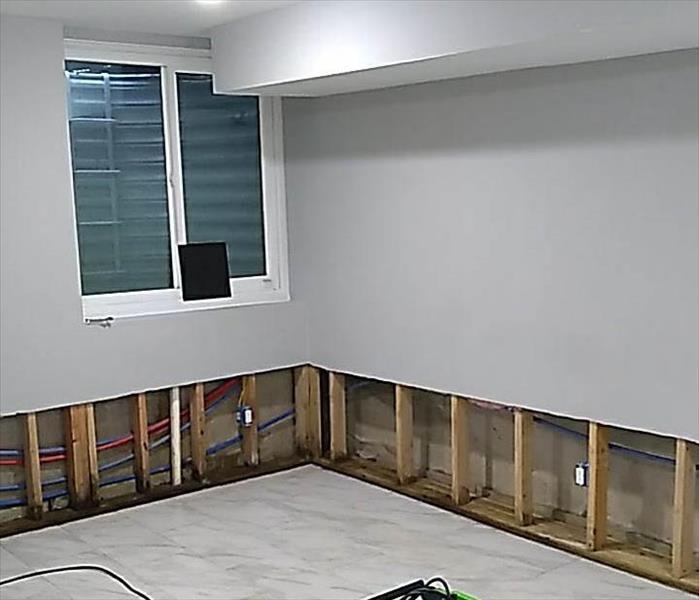
Dry Out the Affected Area
After removing the standing water, dry out the affected area with dehumidifiers, fans, or open windows to promote air circulation. Carpets, padding, and other absorbent materials may need to be removed and replaced if they cannot be completely dried.
Clean and Disinfect
Clean and disinfect the affected area thoroughly to prevent mold growth and ensure a hygienic living environment. Use cleaners that can effectively remove mold, bacteria, and other contaminants.
Contact Professionals
Contacting a professional water damage restoration company can help ensure the thorough cleanup and restoration of your basement. Professionals have the necessary equipment and expertise to handle complex water damage issues. They can also identify potential hazards and offer solutions to prevent future flooding.
A flooded basement can be a daunting issue to face, but taking prompt action can minimize the damage and ensure everyone's safety. By following these steps, you can tackle a flooded basement effectively, restoring your property and peace of mind.
Electrifying Truths: The Science Behind Lightning, Debunking Myths
1/3/2024 (Permalink)
Lightning, with its spectacular flashes and thunderous roars, has captivated human imagination for centuries. However, the myths and misconceptions surrounding this natural phenomenon often overshadow the fascinating science that governs it. In this blog, we embark on a journey to uncover the truth about lightning, exploring the scientific intricacies that dispel common myths and shed light on the electrifying reality.
Myth 1: Lightning Never Strikes the Same Place Twice
- Reality: Lightning can and does strike the same place multiple times.
While it's true that lightning seeks the path of least resistance, geographical features and structures can influence its behavior. Tall structures, like skyscrapers and communication towers, are more likely to attract lightning due to their height. Lightning rods are designed to intercept and conduct lightning safely to the ground, and they often experience multiple strikes.
Myth 2: Lightning Only Strikes During Thunderstorms
- Reality: Thunderstorms are the primary lightning producers, but lightning can occur in other weather conditions.
Thunderstorms are the most common generators of lightning, but it can also occur in volcanic eruptions, intense forest fires, and even in non-thunderstorm environments. These events, known as "dry lightning," are a reminder that the conditions for lightning can exist beyond the traditional thunderstorm setting.
Myth 3: Rubber Tires Protect You from Lightning in a Car
- Reality: The car's metal frame, not the rubber tires, offers protection from lightning.
While it's true that rubber is an insulator, the metal frame of a car creates a "Faraday cage," conducting the electrical charge around the occupants and into the ground. So, it's not the tires that provide protection but rather the metal enclosure of the car.
Myth 4: Lightning Never Strikes the Ocean
- Reality: Lightning can and does strike the ocean, posing risks to those in and around the water.
Water is a good conductor of electricity, and lightning can strike the ocean, potentially affecting aquatic life. Swimmers, boaters, and those on the beach are still at risk of being struck indirectly by lightning, especially if they are in or near the water.
Myth 5: Lightning Can Turn People Into Ash
- Reality: While lightning strikes can cause severe injuries, they rarely result in complete incineration.
Lightning can cause serious injuries, ranging from burns to neurological effects, but the idea that it instantly turns people into ash is a dramatic exaggeration. Most lightning-related fatalities are due to the electrical and thermal injuries caused by the intense heat and electrical currents.
Myth 6: Lightning Never Strikes in Winter
- Reality: Lightning can occur in any season, including winter.
Although lightning is more common in warmer months, it's not exclusive to summer. Winter thunderstorms, though less frequent, can still produce lightning. Snow and ice can act as conductors, and lightning during winter storms is not unheard of.
Myth 7: Lightning Can Only Strike from the Clouds to the Ground
- Reality: Lightning can travel from the ground up and horizontally within clouds.
While cloud-to-ground lightning is the most well-known, intra-cloud lightning (within a cloud) and cloud-to-cloud lightning also occur. In some instances, lightning can even travel from the ground up, known as "ground-to-cloud" or "upward lightning."
Myth 8: Lightning Never Strikes the Poles of the Earth
- Reality: Lightning does strike the Earth's poles, both North and South.
Contrary to the belief that lightning avoids the polar regions, thunderstorms and lightning can and do occur in these areas. While less frequent than in equatorial regions, polar lightning is a natural occurrence in the Arctic and Antarctic.
Lightning, far from being a mythical force, is a natural phenomenon grounded in scientific principles. Understanding the science behind lightning not only dispels common myths but also fosters a deeper appreciation for the power and beauty of this atmospheric occurrence. As we unravel the mysteries of lightning, we gain insights that help us stay safe, dispel misconceptions, and marvel at the awe-inspiring forces that shape our natural world.
Why it’s Important to Change Insulation After a Fire
12/13/2023 (Permalink)
 In the wake of a fire, restoring your property's insulation is a crucial step.
When a fire ravages a home or business, the immediate focus is often on extinguishing the flames and assessing visible damage. However, one crucial aspect that is sometimes overlooked is the insulation within the structure. In the aftermath of a fire, the importance of changing insulation cannot be overstated. In this blog, we'll delve into the reasons why replacing insulation is essential for the safety, comfort, and overall well-being of your property.
Understanding the Impact of Fire on Insulation
Insulation, whether in your walls, attic, or crawl spaces, plays a vital role in regulating indoor temperatures and energy efficiency. However, when exposed to the extreme heat of a fire, insulation can suffer damage in several ways. Most insulation materials lose their effectiveness when subjected to high temperatures. This loss means your property may struggle to maintain a comfortable indoor environment, leading to increased energy costs.
Burnt insulation can also release harmful chemicals and particles into the air, posing risks to those exposed. Lastly, fire-damaged insulation can compromise the structural integrity of your property, reducing its ability to support loads, which may lead to costly repairs down the line.
Why Replacing Insulation is Essential After a Fire
- Safety First: The well-being of your family, employees, or customers is paramount. Replacing damaged insulation is crucial to minimize health risks associated with inhaling hazardous particles released from burnt insulation.
- Energy Efficiency: Energy costs can soar when your insulation is compromised. Replacing damaged insulation ensures your property maintains an energy-efficient environment, saving you money in the long run.
- Improved Comfort: Quality insulation promotes a comfortable indoor atmosphere. Whether it's scorching summers or freezing winters, proper insulation maintains an optimal temperature year-round.
Steps to Replacing Insulation After a Fire
- Start by hiring professionals to assess the extent of the damage and recommend the right type of insulation for your property.
- Safely remove all fire-damaged insulation, ensuring that no harmful particles are released into the air. This process should be handled by experienced experts to minimize health risks.
- Choose high-quality insulation materials that are fire-resistant and meet modern safety standards. Proper installation is key to long-term effectiveness.
- Ensure your property's insulation is properly sealed to prevent air leaks and maintain energy efficiency.
In the wake of a fire, restoring your property's insulation is a crucial step to ensure safety, comfort, and energy efficiency. Professional guidance and expertise are essential in assessing and replacing insulation to guarantee the best results. Remember, fire-damaged insulation not only affects your property's environment but can also impact your well-being.
At SERVPRO® of South Philadelphia, we understand the importance of changing insulation after a fire and are here to help. Contact us for professional guidance and services to restore your property to its full potential!
Key Considerations to Preventing Mold During Construction
11/9/2023 (Permalink)
 Remember, mold prevention is a cost-effective investment in the long-term durability and safety of your buildings.
Mold prevention is a critical aspect of ensuring the longevity and safety of any structure, and it all starts with the construction phase. By implementing the right techniques and materials, you can significantly reduce the chances of mold taking hold in your newly constructed buildings. Let's dive into some best practices for builders and contractors in the Philadelphia area.
Proper Drainage
Philadelphia is no stranger to rain and humidity, making proper drainage a top priority. Ensure that your construction site has effective grading and drainage systems in place to divert water away from the building's foundation.
Waterproofing
Invest in high-quality waterproofing materials for foundations, basements, and crawl spaces. This extra layer of protection helps prevent water intrusion, a common precursor to mold growth.
Site Preparation
Thoroughly prepare the construction site before building. Remove any existing vegetation, tree roots, or debris that can trap moisture against the building's foundation.
Effective Ventilation
Adequate ventilation is essential to keep moisture levels in check. Incorporate proper ventilation systems into the building's design to ensure air circulation and reduce humidity.
Use Mold-Resistant Materials
Consider using mold-resistant materials, such as mold-resistant drywall and treated lumber, where appropriate. These materials are less susceptible to mold growth.
Control Moisture During Construction
Maintain a dry construction site. Cover building materials to protect them from rain and moisture, and use dehumidifiers when necessary.
Regular Inspections
Conduct regular inspections during the construction process to identify and address any potential moisture issues or leaks promptly.
Educate Construction Crews
Ensure that your construction crews are educated about the importance of mold prevention. Teach them to recognize potential mold-prone areas and how to address them.
Gutters and Downspouts
Install gutters and downspouts to direct rainwater away from the building's foundation. Keep them clean and well-maintained to prevent overflow.
Landscaping Considerations
Plan landscaping to promote proper drainage. Use sloping and grading techniques to direct water away from the building.
Monitor Humidity Levels
Use humidity monitoring systems to keep track of indoor moisture levels during construction and after occupancy. Address any spikes promptly.
Implementing these construction best practices can go a long way in minimizing the risk of mold growth in your Philadelphia-area projects. By focusing on proper drainage, waterproofing, site preparation, and other preventative measures, builders and contractors can create structures that are not only sturdy but also mold-resistant.
Remember, mold prevention is a cost-effective investment in the long-term durability and safety of your buildings. If, despite your best efforts, you encounter mold issues, don't hesitate to reach out to SERVPRO® of South Philadelphia/SE Delaware County for professional mold remediation services.
Choosing Sustainable Materials to Rebuil After Water Damage
10/14/2023 (Permalink)
 Rebuilding after water damage is a challenging process, but it also presents an opportunity to make eco-conscious choices.
Water damage can be a devastating experience for homeowners and businesses alike in Pennsylvania. From burst pipes to severe storms, the aftermath of water damage can leave you with the daunting task of rebuilding. While the primary goal is to restore your property to its former glory, it's also essential to consider the environmental impact of your choices. In this blog, we'll explore the importance of choosing sustainable materials when rebuilding after water damage in Pennsylvania, and how it can benefit both you and the environment.
Why Choose Sustainable Materials?
Environmental Responsibility
Pennsylvania is known for its stunning natural beauty, and choosing sustainable materials for your rebuilding project is a way to give back to the environment. By opting for eco-friendly materials, you reduce the strain on natural resources, minimize waste, and lower your carbon footprint.
Energy Efficiency
Pennsylvania experiences a range of weather conditions throughout the year, from frigid winters to humid summers. Sustainable materials, such as energy-efficient windows and insulation, can help you maintain a comfortable indoor environment while reducing your energy bills.
Durability
Sustainable materials are often more durable and long-lasting than traditional options. This means less frequent replacements and repairs, which can save you money in the long run.
Choosing Sustainable Materials in Pennsylvania
Reclaimed Wood
Consider using reclaimed wood for flooring, furniture, or decorative elements. This type of wood is salvaged from old structures and repurposed, giving it a unique and rustic charm. Reclaimed wood not only adds character to your space but also reduces the demand for freshly cut timber.
Low VOC Paints
Volatile Organic Compounds (VOCs) found in traditional paints can release harmful toxins into the air. Opt for low-VOC or zero-VOC paints to ensure better indoor air quality for your Pennsylvania home or business.
Recycled Glass Countertops
Upgrade your kitchen or bathroom with recycled glass countertops. These stunning surfaces are made from recycled glass materials, making them an eco-friendly and stylish choice.
Insulated Concrete Forms (ICFs)
Pennsylvania's temperature fluctuations make proper insulation crucial. ICFs are an energy-efficient option that provides excellent insulation while reducing your heating and cooling costs.
Metal Roofing
Metal roofs are durable and recyclable, making them an excellent choice for Pennsylvania's climate. They can withstand harsh weather conditions and have a long lifespan.
Sustainable Flooring
Consider eco-friendly flooring options like bamboo, cork, or linoleum. These materials are renewable and biodegradable, making them sustainable choices for your home or business.
Rebuilding after water damage in Pennsylvania is a challenging process, but it also presents an opportunity to make eco-conscious choices that benefit both you and the environment. By selecting sustainable materials, you can reduce your environmental impact, save on energy costs, and create a durable and beautiful space. SERVPRO of South Philadelphia/SE Delaware County is committed to helping you through this process, and we can provide guidance and services to ensure your rebuilding project is as sustainable as possible. Contact us today to learn more about our restoration and rebuilding services in Pennsylvania.
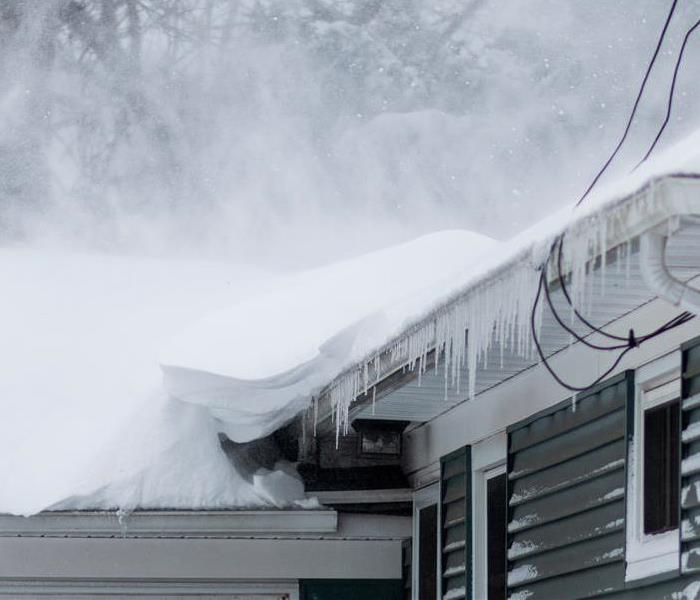
Guide to Preventing Ice Dams and Roof Leaks
9/12/2023 (Permalink)
 By taking these preventative measures, you can enjoy a worry-free winter and protect your home and property from the potential hazards of ice dams.
Winter in the Northeast brings picturesque snowscapes, but it also poses potential risks to your home and property, such as ice dams and roof leaks. Ice dams are a common winter woe that can lead to water infiltration, damaging your roof, ceilings, and walls. As a homeowner or property owner, it's essential to take proactive measures to prevent ice dams and roof leaks. In this blog, we'll explore effective strategies to safeguard your home and property during the winter months and keep ice dams and roof leaks at bay.
Understanding Ice Dams and Roof Leaks
Ice dams form when snow on the roof melts, flows down to the eaves, and refreezes due to the colder temperatures at the roof's edge. As the ice accumulates, it creates a barrier that traps water, which can seep into your home, causing roof leaks and water damage. Roof leaks not only compromise the structural integrity of your property but also lead to mold growth and other potential hazards.
Ensure Proper Attic Insulation and Ventilation
One of the key contributors to ice dams is an inadequately insulated and poorly ventilated attic. Warm air escaping from your living spaces can cause snow on the roof to melt, leading to ice dam formation. Ensure your attic is well-insulated to prevent heat loss and maintain a consistent temperature. Additionally, proper ventilation in the attic helps regulate the temperature and prevents snow from melting and refreezing at the roof's edge.
Clean Gutters and Downspouts Regularly
Clogged gutters and downspouts can exacerbate ice dam formation. Before winter sets in, ensure your gutters and downspouts are clear of leaves, debris, and ice buildup from fall. This allows melted snow to flow freely and reduces the risk of ice dams forming.
Use Roof Rakes for Snow Removal
Roof rakes are useful tools for preventing snow buildup on your roof. After heavy snowfall, use a roof rake to remove snow from the roof's edge, where ice dams typically form. Be cautious not to damage your roofing materials during snow removal.
Apply Ice Dam Prevention Products
Several ice dam prevention products are available, such as heat cables or heated panels, which can be installed along the roof's edge. These devices help create a pathway for melted snow to drain, preventing ice dams from forming.
Seal Air Leaks in Living Spaces
Reducing air leaks in your living spaces can minimize the warm air flow into your attic, thus reducing the likelihood of ice dam formation. Caulk and weatherstrip windows and doors, seal gaps around pipes and vents, and insulate any exposed areas.
Schedule Professional Roof Inspection
Before winter arrives, schedule a professional roof inspection. A qualified roofer can assess the condition of your roof, identify potential vulnerabilities, and address any issues that could lead to ice dam formation and roof leaks.
Preventing ice dams and roof leaks requires proactive measures and attentiveness to your home's insulation and ventilation. Properly insulating and ventilating your attic, cleaning gutters, and using roof rakes for snow removal are all essential steps. Additionally, employing ice dam prevention products and sealing air leaks in your living spaces contribute to safeguarding your property during winter. Scheduling a professional roof inspection before the onset of winter ensures your roof is in good condition and ready to withstand the challenges of the season. By taking these preventative measures, you can enjoy a worry-free winter and protect your home and property from the potential hazards of ice dams and roof leaks.
How to Keep Your Pets Safe in the Event of a Fire
8/30/2023 (Permalink)
As a loving pet owner, your furry friends are an integral part of your family. Just like any other family member, their safety should be a top priority, especially in the event of a fire. Fires can be unpredictable and extremely dangerous, so it's essential to have a plan in place to ensure the well-being of your pets. In this blog post, we'll explore some crucial steps you can take to keep your pets safe in case of a fire emergency.
Include Your Pets in Your Fire Escape Plan
Having a well-thought-out fire escape plan is important for everyone in your household, including your pets. Choose a designated meeting point outside the house where you and your pets can gather safely. Remember to practice your escape plan regularly, so both you and your pets are familiar with the procedure. If you have multiple pets, consider assigning each one to a specific family member during the evacuation.
In the event of a fire, every second counts. Make sure your pets are always kept near entrances and exit points of your home. This will make it easier for both you and your pets to evacuate quickly and efficiently. Avoid leaving them confined in areas from which escape would be challenging, such as basements or upper floors.
Display Pet Alert Stickers
Place "pet alert" stickers or decals on your windows to alert firefighters and rescue workers that there are pets inside your home. These stickers typically include the type and number of pets, providing crucial information to those involved in rescue efforts. Be sure to update these stickers if there are any changes to your household pets.
If you are unable to evacuate with your pets during a fire emergency, designate a safe room where you can secure them until help arrives. Ideally, this room should have a door that closes securely and is free from potential fire hazards. Keep essential supplies, such as water, food, and crates or carriers, readily available in this room. Make sure the room has proper ventilation and a window that can be opened for fresh air.
Keep Collars, Leashes, and Carriers Accessible
In case of an emergency, have your pets' collars with identification tags, leashes, and carriers easily accessible. This will allow you to quickly and safely secure your pets and transport them to safety. Ensure that the identification information on your pets' collars is up to date with your current contact details.
When emergency responders arrive, inform them about your pets and their locations inside the house. This will enable them to prioritize rescue efforts and ensure the safety of your beloved pets. Informing responders about any specific needs or behaviors of your pets, such as fear of strangers or hiding places, can be crucial in facilitating the rescue process.
Prevention is Key
Prevention is key when it comes to fire safety for pets. Never leave your pets unattended near open flames, such as candles, stoves, or fireplaces. Pets can accidentally knock over or get too close to these sources of fire, increasing the risk of fires and injuries. Be mindful of potential fire hazards and take necessary precautions to prevent accidents.
By following these essential steps, you can ensure the safety of your pets in the event of a fire. Remember, preparedness and prevention are key. Regularly reviewing and practicing your fire safety plan, as well as taking precautions to prevent fires in the first place, will go a long way in safeguarding your pets' well-being. With your love and care, along with a well-executed fire safety plan, you can provide the best protection for your four-legged family members.


 24/7 Emergency Service